Strip Natural
Product info
Dimensions:
7" x 48"
Thickness:
5.0 mm
Protect Coating:
UV Coatings
Wear Layer:
20 Mil
Sq.ft/Carton:
23.896 sqf
Underlayment:
IXPE 15x 1.0mm


Redefining Luxurious Living | Premium SPC Flooring by Flooring International Outlets
Authentic Aesthetics: “Utilizes high-precision synchronized
embossing technology and high-definition digital printing to perfectly replicate the grain, texture, and knots of natural wood, making each plank a unique work of art.”
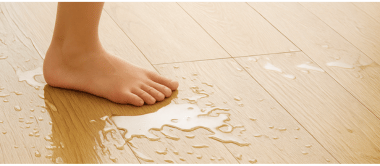
Comfort & Safety: “The surface is coated with UV coating for easy cleaning. The dense yet resilient core provides comfort-
able underfoot feel and effectively reduces noise.”

Exceptional Performance: “The 4-layer composite structure offers 100% waterproof, moisture-proof, and anti-moth properties. Suitable for underfloor heating environments, it is highly wear-resistant, impact resistant, and safeguards your family’s health.”
Features

7″ x 48″
Dimensions
5.0 mm
Thickness
20mil
Wearlayer
UV Coatings
Protect Coating
IXPE 15x 1.0mm
Underlayment
18.12
Sq.ft/Carton
Lifetime
Residential Warranty
10 Years
Commercial Warranty
SPC structure
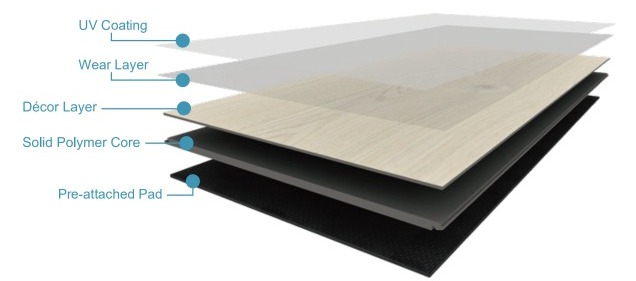
UV Coating
UV Coating is a first layer that protects the surface from stains, resists UV rays and ensures that the floor does not fade after a long period of sunlight exposure.
Wear Layer
Wear Layer provides protection against floor abrasion, this coating is waterproof, stain and scratch resistant, embossed to provide texture to the floor.
Decor Film
Decor Film is a thin PVC film for printing decorative layers of different color patterns. The printed pattern has a high degree of realistic look.
Solid Polymer Core
Solid Polymer Core is the thickest and hardest layer. The stone-plastic compound prevents expansion and contrac- tion caused by temperature and humidity, keeping the floor in good condition and durable for a long time.
Pre-attached Pad
Pre-attached Pad has the effects of buffering, shock absorption, water resistance and sound absorption. It can reduce the noise and vibration of the room when walking.
Why choose SPC flooring?
HOW DO YOU INSTALL SPC FLOORING?
WITH A SIMPLE CLICK!
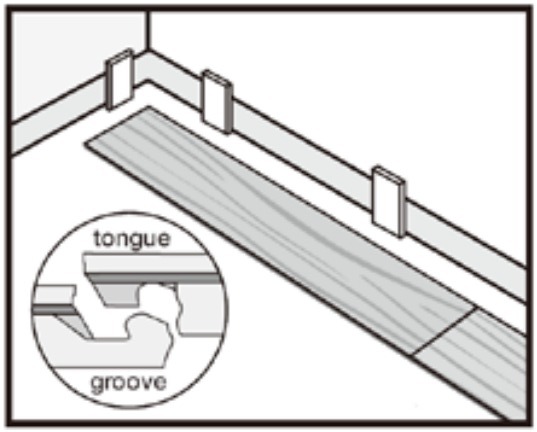
SPC planks join together without the need for adhesives or other external elements. Their ingenious tongue and groove locking system allows them to fit together like a jigsaw. Thanks to this adhesive-free click system, SPC flooring can be installed on practically any surface (cement, wood, tiles, ceramic, etc.) without the need to fix it to the existing floor.
Prior to installation, it’s essential to install an underlay to protect the floor from mois- ture and improve insulation, as well as dampening noise and correcting any minor floor levelling irregularities.
SPC floors offer many advantages over other floors due to their installation system, easy maintenance,value for money, wide range of designs and textures, etc. Check it out:
INSTALLATION
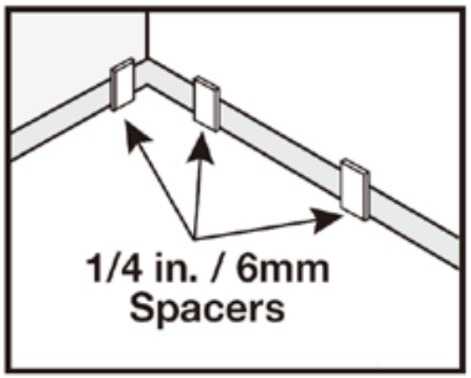
INSTALLING FIRST ROW
Set spacers to allow a minimum gap of 1⁄4″ (6mm) around the perimeter of the subfloor for movement or product expansion. Do not remove the spacers until the installation is complete. The expansion gaps should be covered by molding.
Measure the length of the room in inches. Divide it by the length of the planks. If the resulting number is less than 8", you will need to cut your frst plank accordingly to avoid having planks that are less than 8" on the opposite end of the room.
Note: To cut a plank, simply measure and mark the plank. Then, usea straight edge and utility knife to score and snap. You will also needto back-cut the under pad on the bottom ofthe plank. If you havedificulty using this method, you can use a jig saw, circular saw or miter saw.
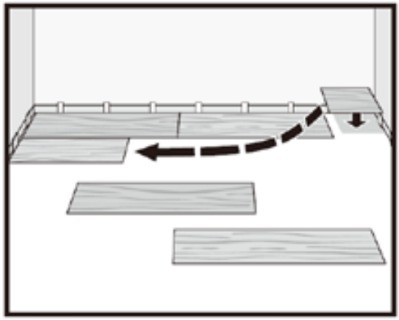
Installation should start in a left-hand corner and proceed from the wall with the tongue facing the wall. Position the first plank 6″ (15.2cm) from the starting wall but not up against the spacers. The entire row will be moved against the spacers in a later step.
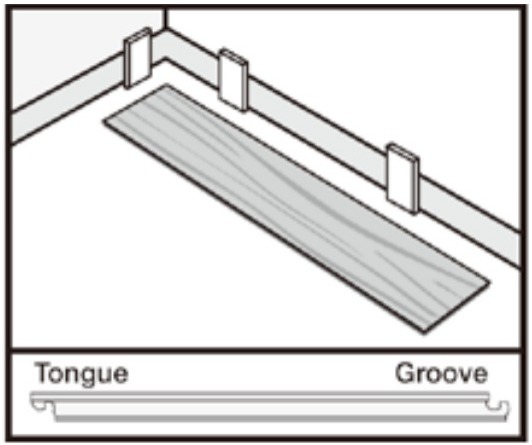
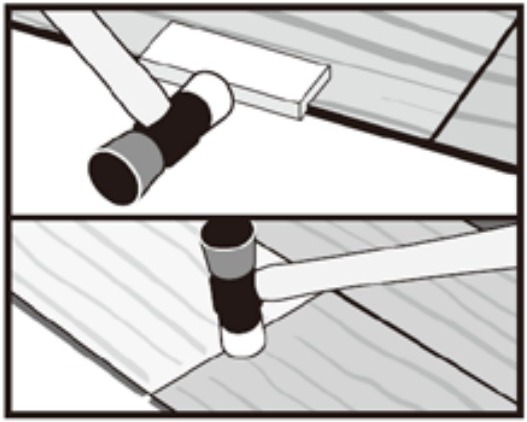
Interlock the next plank at the end joint of the first plank by inserting the tongue into the groove of the adjoining planks.
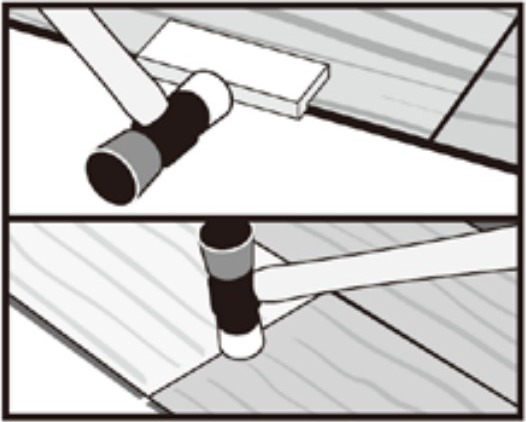
Square the joints by tapping the long edge with the profiled tapping block and soft-faced hammer. Next, lightly tap down on top of the plank at the short joint with the soft-faced hammer.
Continue this method to finish the first row.
Cut the last piece of the row to fit, and allow for the 1/4″ (6mm) expansion gap (if you have not already done so). Install as above.
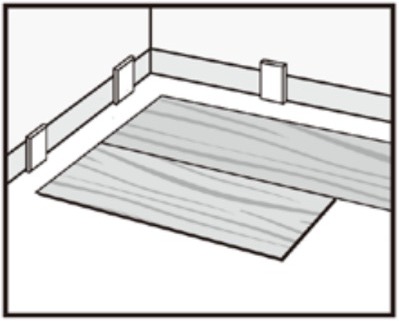
INSTALLING SECOND AND REMAINING ROWS
Cut the first plank of the second row to two-thirds its length or make sure there will be at least an 8″ (20.3cm) stagger between end joints. Angle the long tongue edge of the plank into the long groove edge of the first plank. Drop and lock the end joints together.
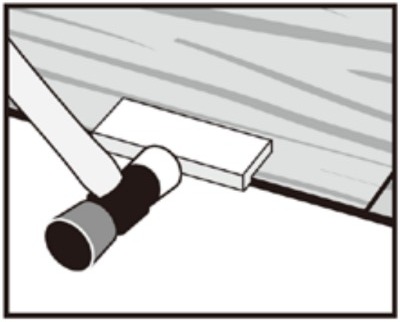
Make sure there are no gaps and, if necessary, tap along the long groove edge using the soft-faced hammer and profiled tapping block to ensure a tight fit.
Do not tap the short end into place if the long joint is not properly engaged, as doing so can cause damage to the tongue and groove.
Note: When starting a new row, you can use the cut piece from the previous row, as long as it is more than 8″ (20.3cm) and the stagger between seams still is greater than 8″ (20.3cm).
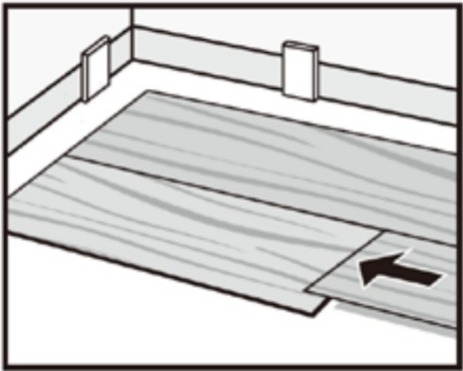
Attach the second plank by connecting the long side to the first row and sliding it up to the short end of the first plank. Check that the long joints of the planks are properly engaged and then press the short joint into place with your fingers.
Continue to square the joints by tapping the long edge with the profiled tapping block and soft-faced hammer. Then, lightly tap down on top of the plank at the short joint with the soft-faced hammer Continue installing the remainder of the row in this fashion.
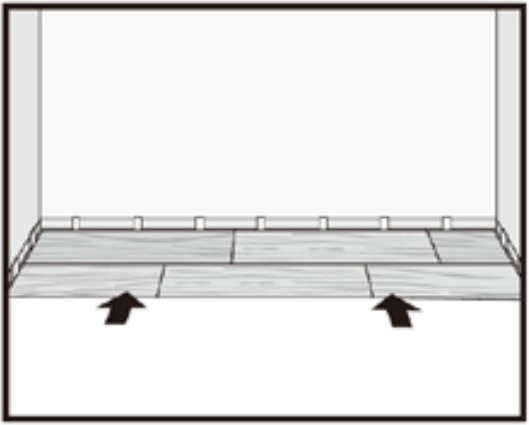
After installing the last piece of the second row, slide the entire assembly against the spacers on the starting wall, maintaining
the required 1/4″ (6mm) expansion gap.
Install remaining rows, one row after the other, and maintain the required8″ (20.3cm) stagger throughout the install. Tap and square each plank as in step 7.
INSTALLING THE LAST ROW
Most often, the entire length of the last row will need to be cut so that it is narrow enough to fit the remaining space. Cut the first plank of the last row to length (if necessary to follow stagger pattern). Place directly on top of the previously installed row. Then, take another plank and place it against the wall on top of the plank to be cut for width. Mark the plank (length-wise), cut to size. Remember to allow for the 1/4″ (6mm) expansion gap against fixed objects.
Install the plank with the cut side always facing the wall. Use a pull bar to lock the long edges together. Do not use the pull bar on the short edges.
Continue to cut and install remainder of the planks in the last row.
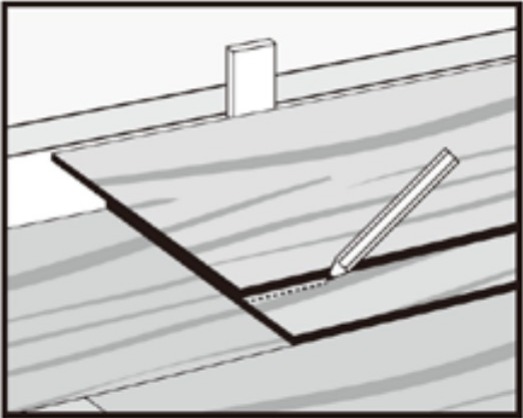
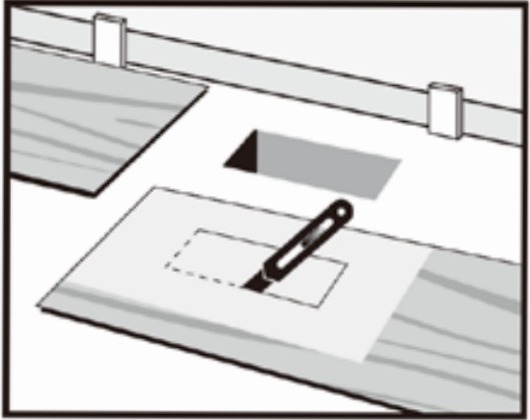
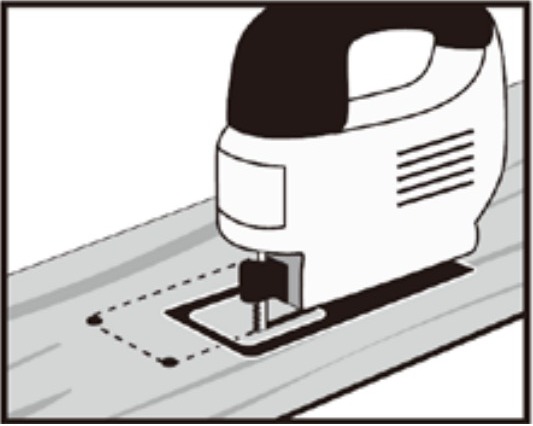
FITTING AROUND IRREGULARLY SHAPED OBJECTS
Make a template to fit around pipes or irregular shaped objects. Place the pattern upon the plank and trace. Cut along the trace lines using a utility knife or jig saw, and lay plank. Alternatively, a hole saw can be used when cutting planks that are to fit around pipes.
Note: Be sure to leave a minimum of 4″ (6mm) expansion space around all fixed objects, cabinetry, and metal door jambs.
TESTIMONIALS
A wide range of LVP vinyl plank flooring options on Furnish My Place Flooring LLC exceeded my expectations. I could easily find the perfect flooring for my home. I was able to make informed decisions through the detailed product information and reviews on their website.
I am more than happy to express that my new waterproof vinyl plank flooring amazingly transformed my space. I can’t thank Furnish My Place Flooring LLC enough for offering such a versatile and unparalleled collection of luxury vinyl plank flooring.
Unable to find the best luxury vinyl plank flooring options for your space? I was too, unless Furnish My Place Flooring LLC impressed me with a variety of waterproof vinyl flooring. The quality they offer cannot be matched. I was able to make stress-free decisions through the articles on their website.
Start Your Flooring Journey Here!
Let us know your preferences
and we'll get back to you.
What Our Customers Say
EXCELLENTTrustindex verifies that the original source of the review is Google. We’re very happy with the work this team did for us! They replaced our flooring with beautiful LVP and completely redid our staircase — everything looks stunning and was done with great attention to detail. The crew was professional, respectful, and finished everything on time. Highly recommend them!Posted onTrustindex verifies that the original source of the review is Google. The best investment I’ve made! Furnish My Place Flooring’s LVP flooring is high-quality, easy to install and completely transformed my space!! Their attention to detail and commitment to customer satisfaction are outstanding!!!Posted onTrustindex verifies that the original source of the review is Google. Great experience purchasing LVP flooring from Furnish My Place FlooringPosted onTrustindex verifies that the original source of the review is Google. Great experience with Furnish My Place!Posted onTrustindex verifies that the original source of the review is Google. I recently purchased LVP flooring from Furnish My Place The quality is outstanding—durable, stylish, and exactly what I was looking for. The prices were incredibly affordable compared to other options I checked out. The entire buying process was smooth, and the customer service team was friendly and helpful. Highly recommend this company if you're looking for high-quality flooring at great prices!Posted onTrustindex verifies that the original source of the review is Google. They did a fantastic job and were very professional. Carpet looks great and job site was clean. I would highly recommend for all of your flooring needs!!Posted onTrustindex verifies that the original source of the review is Google. Great place to buy flooring.Posted onTrustindex verifies that the original source of the review is Google. We took their services to install carpet in our prayer hall, which was done very neatly and nice. Will recommend them to others for their work.
FAQS
What Does LVP Stand for in Flooring?
LVP stands for Luxury Vinyl Plank. The Luxury Vinyl Plank flooring looks like wood but is made of vinyl, offering a cost-effective and waterproof vinyl plank flooring, an alternative to hardwood.
How Much Does LVP Flooring Cost?
LVP flooring from Furnish My Place Flooring LLC starts at $1.49 per square foot, making it an affordable choice for luxury flooring.
Is LVP Flooring Waterproof?
Yes, LVP flooring is waterproof. Waterproof vinyl plank flooring is an excellent choice for areas prone to moisture, such as bathrooms and kitchens.
How durable is LVP flooring?
LVP flooring is highly durable, especially with the 20 MIL wear layer, which offers protection against scratches and general wear and tear.
What is the warranty on LVP flooring?
We offer a lifetime warranty on all LVP flooring products, ensuring long-lasting protection against manufacturing defects.
How to Clean LVP Waterproof Flooring?
waterproof vinyl flooring can be easily cleaned daily using a vacuum to remove debris, a damp mop with a mild vinyl floor cleaner, or a mild dish soap. You should avoid using harsh chemicals and should clean the spills quickly to maintain their shelf life.
Is LVP Flooring available at wholesale prices?
Yes, we provide wholesale pricing for bulk orders, making it an ideal option for large-scale projects or commercial installations.
What is the thickness of LVP Flooring?
Our LVP flooring features a 5.5 mm thick plank with an attached 1.5 mm pad, providing durability, comfort, and noise reduction.
Is LVP Flooring pet and kid friendly?
Yes, LVP flooring is perfect for homes with pets and children. Its scratch-resistant and waterproof features make it durable enough to handle the everyday wear and tear from active households.